by bee_pipes » 14 Feb 2009 17:33
Last year I came across an article by Jarrett D. Kelly in a back issue of Backwoods Home Magazine (#96) titled ”Build a top-bar beehive“. I had heard of top bar hives – they get a lot of use in third world countries for starting out beekeeping businesses in small villages. They are simple in design and construction and let the bees do most of the work. Rather than a bewildering assortment of hive bodies, supers, frames, etc., a top-bar hive is a long box in which the bees build comb than hangs freely from the top bars. The bees follow their own inclination when building comb, rather than the beekeeper trying to keep them within the bounds of the frame. No matter how careful the beekeeper is, bees will build burr and bridge comb between frames and the inside cover, and depending on the species, glue shut every opening in the hive. All this on your nice, new $150 hive. Don’t get me wrong, none of this stuff is impossible to deal with, and just makes beekeeping that much more interesting – trying to manage the bees.
Well, if you are looking for specific dimensions in Kelly’s article, you won’t find all of them. A pattern and dimensions are provided for the ends of the hive and roof, and dimensions are given for the width of the bars and length of the hive, but he doesn’t spell everything out for you. This is a good thing. If all parts were specified to strict tolerances, it would be easy to botch the job by being off on one cut. My accuracy with wood working is not the best, so it all worked out well. The trick is to get the end pieces cut accurately, then measure and cut from those end pieces. This being our first attempt at building a top-bar hive, we were a bit pain staking about following the directions.
We used the following materials:
one sheet (8’x4’) of plywood, ¾” thick – purchased for $26 at the local hardware store
one piece of scrap lumber (1x4) cut into two 58” lengths
three pieces of inexpensive 2x4 studs for top bars
Elmer’s carpenter glue
1 5/8” exterior screws
1” exterior screws
a hand full of ¾” nails
primer, paint and a little silicone caulk.
The plywood and 2x4 were the only purchases; we had all of the materials on hand already. Tools used were a jig saw, circular saw, auger and brace, drill and tack hammer.
A neighbor had a planer and table saw, and was kind enough to do a little work on the top-bars. A table saw alone is enough to do all the top-bar work. Figure 1 shows the basic layout of parts to be cut from a single piece of plywood. Orientation of these parts is important to keep all parts within one sheet.

Figure 1 – rough layout for (1) 8’x4’x3/4” Sheet of Plywood
1 – cut Hive Body Ends – 120º angle on sides. Cut 1 ½” from small side of one piece for entrance.
2 – cut Hive Body Bottom Board – 30º bevel on both long sides.
3 – cut Hive Body Sides – 30º bevel on both long sides. Cut 1 inch shorter than long side of hive body ends (#1).
4 – build Hive Body – Add 1x4 handles, cut lengths to extend 8 inches past both ends of hive body. Add 3/16” spacers inside Hive Ends.
5 – cut Hive Roof Gables – should rest within handles, wide part of gable should meet handle tops.
6 – cut hive roof supports – long enough for gables to rest outside hive body – allow 1/8 to 3/16 inch slop for paint.
7 – cut Hive Roof Panels – allow for overhang on sides of hive and front and back of hive.
8 – Hive Roof Caps – 30º bevel between the two pieces.
9 – build Hive Roof - supports between gables, flush with edges of gables. Hive Roof Panels, bead of silicone caulk in gap at peak. Hive Roof Cap join at 30º bevel.
1) Hive Body End Pieces
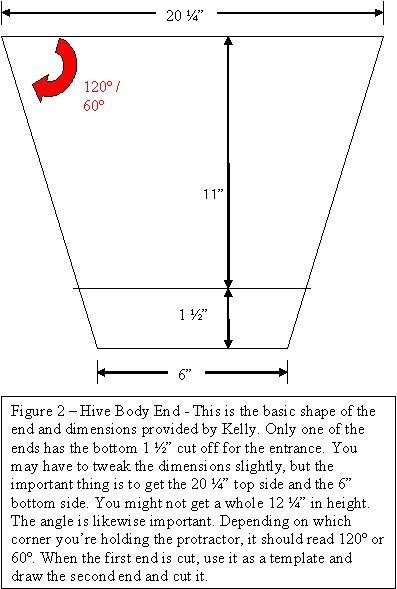
Kelly provides a template for then end pieces of the hive body and roof. The hive body is a trapezoid measuring 20 ¼” across the base and 12 ½” in height. The angles from the base are given as 120º degrees (60º on the opposite corner) and supposed to result in a narrow end of 6” across. I measured the angles with an inexpensive plastic protractor. The narrow end was less than six inches. Getting a six inch base with the base and height supplied by Kelly was the first problem. It was probably an error on my part, but it was the best result we could get. The hive body end pieces were cut from the plywood using a jig saw. The first end piece was used as a template to cut the second end piece. At this starting point, we weren’t sure if the sheet would be enough for the entire project, so we did our best to reduce waste and maximize the plywood. The narrow end of one of the end pieces is cut off to provide the bee entrance on the hive. Kelly’s diagram shows 1 ½”, the article text called for 1 5/8”. This eighth inch seems like a trifling difference, but the thickness of the plywood and considerations for bee space (3/8”) raised a red flag. Fortunately, the entrance is not as crucial as the space between frames, as in a Langstroth hive. Figure 2 shows the hive end piece.
Bottom Board and Sides
Working with blind faith, we cut a bottom board six inches wide and 48” in length, as recommended by Kelly. A bevel of 30 degrees was also recommended for the long sides of the bottom board. We did this with a circular saw because it was a straight cut and our jig saw could not make this bevel. With the exception of the angled end pieces, all other sides of the hive are straight cuts, and lend themselves well to cutting with the circular saw. Since my narrow side of the end piece was not six inches we wound up trimming about an inch and a half off of both our end pieces. The next time we do this, we will use the narrow end of our end pieces as the measurement for the bottom board width.
Next, a spacer of 3/16” x ¾” was to be attached to the inside of each end piece. There weren’t any pictures of this spacer, so we carefully read the article to be sure we were doing it correctly. Shaving 3/16” off of a piece of plywood with a jigsaw is not the easiest thing in the world to do. After two tries, I got a piece long enough and even enough to use. The spacer goes across the inside of each end piece, along the base or 20 ¼” side of the end piece, and provides bee space between the ends and first and last top-bars. The spacers were put on with glue and ¾” nails. Surprisingly the nails did not split the plywood.
The sides were recommended at 12 5/16” wide and 44 9/16” in length. The length was given as crucial to hold thirty-two top-bars, each 1 3/8 inch wide. The cuts on the sides were also to be beveled at 30 degrees. I could see the sides of the hive would have been better suited to a width over 14 inches, but this was our first time and we were trying to follow directions. I have to give Kelly credit, the beveled edges fit together better than anything I’ve ever tried to make. The next time we do this, we will use the end pieces as the measurement of side width. The sides are supposed to span the distance between the bottom board and the spacers. It’s not quite as tall as the sides of the end pieces – the handles allow a gap so that the top bars can rest on the top edge of the plywood sides (see photographs).
We attached the bottom board and sides to the back end piece. The front end piece has the bottom removed as an entrance, and the bottom board extends past the front end piece as a landing area for the bees. Past experiences with plywood makes me extremely cautious about nailing the edges of plywood. I had no desire to split the sheets and weaken the structure. We used a drill to make pilot holes and drive 1 5/8” screws for fasteners. Kelly, likewise, recommends the use of screws. In addition, we used wood glue on each joint. Once the sides and bottom board were attached to the back end piece, the structure was very sturdy and the front end piece could be attached.
At this point, the ends of the spacers are trimmed and the handles are attached. Kelly recommended two inch wide pieces of plywood. It may have been strong enough, but I preferred a piece of 1x4 scrap lumber I had handy. The length turned out to be about 58” for each handle. This allowed the pieces to extend six inches past the ends of the hive body, convenient for moving or carrying the hive – eight inches would have been better. There was an obvious shortcoming in the width of the sides – I should have gone with my gut-instinct and cut the width at 14 inches. But, on the plus side, the 1x4 handles would fix the shortcoming and make a stronger handle than plywood. Looking back, we might have run out of plywood if we didn’t use scrap lumber. The handles should come flush with the wide side of the end piece and still provide some overlap with the plywood sides. The handles were attached with wood glue and one inch screws (after drilling pilot holes). The one inch screws were just barely long enough, the 1 5/8” screws would have been too long. To increase the bite the one inch screw had, I took a larger drill bit and made a shallow recess for the screw heads in the plywood, so the one inch screw would bite deeper into the handles.
Roof
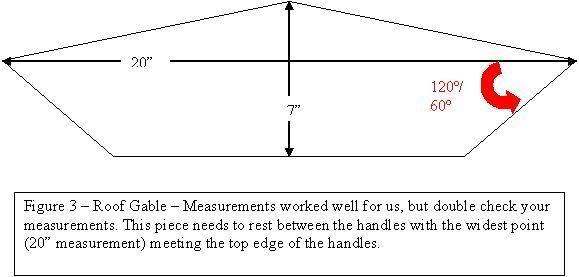
Next was the roof. Having learned our lesson, we measured the distance between the handles, across the top of the hive body. That would be our wide dimension for the roof gables, or end pieces – 20 ¼”. Kelly recommended 7” in height, so we drew a box 20 ¼” x 7”, found the vertical center, marked a horizontal line two inches from the bottom, and drew in the shape. The sides of the hive were a 120º angle, so the protractor was used for the bottom 2” of the roof. See Figure 3.
The gables fit well between the handles. Measurement between the gables, plus 1/8 “ inch to allow for paint, gave us the length for 4 plywood strips, 3 inches wide, to attach between the gables. The exact location of these strips is not too important, so long as they do not interfere with how the roof sits on the hive, and provide support for the roof. As Kelly pointed out, the roof could be a simple piece of tin or plywood, lying flat on the hive top, but I really liked the looks of his roof and followed the pattern to some extent. Rather than cutting a lot of pieces to make the roof, as he did, requiring tar paper to weather proof the roof, we cut two pieces of plywood and notched it to get the same “ginger-bread house” effect. The plywood was 51” in length, allowing for a two inch overhang at each end, and thirteen inches wide, allowing for a generous overhang on each side. The notches were ½” deep and 1” wide, made at three inch intervals. It gave the same basic effect. These roof pieces were attached to the gables with 1 5/8” screws from the outside, and 1” screws from the inside. Glue was applied between the plywood strips and the back of the roofing panels.
The roofing panels were straight cut – no bevel. This left a gap along the peak of the roof. I filled this gap with a bead of silicone. As per the article, two small strips of plywood (about 1-2 inches wide) were cut with a 30 degree bevel, and matched up nicely along the peak of the roof. These were attached with wood glue and 1” screws. Using an old auger and brace, holes were bored into each gable for ventilation. Scraps of screen were attached to the inside using wood scraps, glue and ¾” nails. We primed and painted the outside (you never paint the inside of a hive). That pretty much completed construction of the hive. A simple affair, and with lessons learned, I think I could do it in a day. As it was, we took about two days, taking our time and tending to other chores around the yard. Using 1 ¼” screws might simplify construction also, but I wouldn’t run out and by them unless the 1” screws had run out.
Unlike a conventional Langstroth hive, where hive bodies are stacked one on top of the other, a top-bar hive does not give the bees access to the space above the top-bars. In a conventional hive, the bees need this access because it leads to more frames. The top-bar hive is all on a single level, so this access is not a requirement. If the bees could get into this space, they would fill it with burr comb and propolis (bee glue) – it is a large empty space. This makes it crucial for the top bars to fit together closely enough to prevent bees from getting into the roof area.
The top-bars were supposed to be 1 3/8” wide – this affects bee space. Most store bought 2x2 and 2x4 is around 1 ½” thick. Pricing eight foot lengths of 2x2 I found they cost almost as much as 2x4, so we picked up three 2x4’s. A friend of mine has a planer and table saw, and cut the top-bars for me. First, he planed the boards to a thickness of 1 3/8”. The boards were then ripped on a table saw, resulting in six boards 1 3/8” x 1 7/8”. The cut sides were the most square, so they were used as the bottom surface of the top bars. Next, a ½” slot was cut along the length of these boards. This slot, or kerf, will receive the spline (a thin piece of wood) that will serve as the foundation for the top-bar hive. We made spline by shaving scrap lumber with the table saw. The spline is just wide enough to fit into the kerf with a little coaxing from a rubber mallet and trimming by whittling the edge with a utility knife. When the spline fits, a little elmer’s glue holds them in permanently. Once the glue on all the top bars has dried, the spline is painted with bees-wax. I had some old bees wax candles with burned out wicks. Chips from the old candles were melted in a pyrex measuring cup sitting in a pot of boiling water.
Last year I came across an article by Jarrett D. Kelly in a back issue of Backwoods Home Magazine (#96) titled ”Build a top-bar beehive“. I had heard of top bar hives – they get a lot of use in third world countries for starting out beekeeping businesses in small villages. They are simple in design and construction and let the bees do most of the work. Rather than a bewildering assortment of hive bodies, supers, frames, etc., a top-bar hive is a long box in which the bees build comb than hangs freely from the top bars. The bees follow their own inclination when building comb, rather than the beekeeper trying to keep them within the bounds of the frame. No matter how careful the beekeeper is, bees will build burr and bridge comb between frames and the inside cover, and depending on the species, glue shut every opening in the hive. All this on your nice, new $150 hive. Don’t get me wrong, none of this stuff is impossible to deal with, and just makes beekeeping that much more interesting – trying to manage the bees.
Well, if you are looking for specific dimensions in Kelly’s article, you won’t find all of them. A pattern and dimensions are provided for the ends of the hive and roof, and dimensions are given for the width of the bars and length of the hive, but he doesn’t spell everything out for you. This is a good thing. If all parts were specified to strict tolerances, it would be easy to botch the job by being off on one cut. My accuracy with wood working is not the best, so it all worked out well. The trick is to get the end pieces cut accurately, then measure and cut from those end pieces. This being our first attempt at building a top-bar hive, we were a bit pain staking about following the directions.
We used the following materials:
one sheet (8’x4’) of plywood, ¾” thick – purchased for $26 at the local hardware store
one piece of scrap lumber (1x4) cut into two 58” lengths
three pieces of inexpensive 2x4 studs for top bars
Elmer’s carpenter glue
1 5/8” exterior screws
1” exterior screws
a hand full of ¾” nails
primer, paint and a little silicone caulk.
The plywood and 2x4 were the only purchases; we had all of the materials on hand already. Tools used were a jig saw, circular saw, auger and brace, drill and tack hammer.
A neighbor had a planer and table saw, and was kind enough to do a little work on the top-bars. A table saw alone is enough to do all the top-bar work. Figure 1 shows the basic layout of parts to be cut from a single piece of plywood. Orientation of these parts is important to keep all parts within one sheet.
[img]http://i281.photobucket.com/albums/kk217/patandkaren/000_Figure_1_rough_layout_for_sheet.jpg[/img]
Figure 1 – rough layout for (1) 8’x4’x3/4” Sheet of Plywood
1 – cut Hive Body Ends – 120º angle on sides. Cut 1 ½” from small side of one piece for entrance.
2 – cut Hive Body Bottom Board – 30º bevel on both long sides.
3 – cut Hive Body Sides – 30º bevel on both long sides. Cut 1 inch shorter than long side of hive body ends (#1).
4 – build Hive Body – Add 1x4 handles, cut lengths to extend 8 inches past both ends of hive body. Add 3/16” spacers inside Hive Ends.
5 – cut Hive Roof Gables – should rest within handles, wide part of gable should meet handle tops.
6 – cut hive roof supports – long enough for gables to rest outside hive body – allow 1/8 to 3/16 inch slop for paint.
7 – cut Hive Roof Panels – allow for overhang on sides of hive and front and back of hive.
8 – Hive Roof Caps – 30º bevel between the two pieces.
9 – build Hive Roof - supports between gables, flush with edges of gables. Hive Roof Panels, bead of silicone caulk in gap at peak. Hive Roof Cap join at 30º bevel.
1) Hive Body End Pieces
Kelly provides a template for then end pieces of the hive body and roof. The hive body is a trapezoid measuring 20 ¼” across the base and 12 ½” in height. The angles from the base are given as 120º degrees (60º on the opposite corner) and supposed to result in a narrow end of 6” across. I measured the angles with an inexpensive plastic protractor. The narrow end was less than six inches. Getting a six inch base with the base and height supplied by Kelly was the first problem. It was probably an error on my part, but it was the best result we could get. The hive body end pieces were cut from the plywood using a jig saw. The first end piece was used as a template to cut the second end piece. At this starting point, we weren’t sure if the sheet would be enough for the entire project, so we did our best to reduce waste and maximize the plywood. The narrow end of one of the end pieces is cut off to provide the bee entrance on the hive. Kelly’s diagram shows 1 ½”, the article text called for 1 5/8”. This eighth inch seems like a trifling difference, but the thickness of the plywood and considerations for bee space (3/8”) raised a red flag. Fortunately, the entrance is not as crucial as the space between frames, as in a Langstroth hive. Figure 2 shows the hive end piece.
[img]http://i281.photobucket.com/albums/kk217/patandkaren/000_Figure_2_hive_body_end.jpg[/img]
Bottom Board and Sides
Working with blind faith, we cut a bottom board six inches wide and 48” in length, as recommended by Kelly. A bevel of 30 degrees was also recommended for the long sides of the bottom board. We did this with a circular saw because it was a straight cut and our jig saw could not make this bevel. With the exception of the angled end pieces, all other sides of the hive are straight cuts, and lend themselves well to cutting with the circular saw. Since my narrow side of the end piece was not six inches we wound up trimming about an inch and a half off of both our end pieces. The next time we do this, we will use the narrow end of our end pieces as the measurement for the bottom board width.
Next, a spacer of 3/16” x ¾” was to be attached to the inside of each end piece. There weren’t any pictures of this spacer, so we carefully read the article to be sure we were doing it correctly. Shaving 3/16” off of a piece of plywood with a jigsaw is not the easiest thing in the world to do. After two tries, I got a piece long enough and even enough to use. The spacer goes across the inside of each end piece, along the base or 20 ¼” side of the end piece, and provides bee space between the ends and first and last top-bars. The spacers were put on with glue and ¾” nails. Surprisingly the nails did not split the plywood.
The sides were recommended at 12 5/16” wide and 44 9/16” in length. The length was given as crucial to hold thirty-two top-bars, each 1 3/8 inch wide. The cuts on the sides were also to be beveled at 30 degrees. I could see the sides of the hive would have been better suited to a width over 14 inches, but this was our first time and we were trying to follow directions. I have to give Kelly credit, the beveled edges fit together better than anything I’ve ever tried to make. The next time we do this, we will use the end pieces as the measurement of side width. The sides are supposed to span the distance between the bottom board and the spacers. It’s not quite as tall as the sides of the end pieces – the handles allow a gap so that the top bars can rest on the top edge of the plywood sides (see photographs).
We attached the bottom board and sides to the back end piece. The front end piece has the bottom removed as an entrance, and the bottom board extends past the front end piece as a landing area for the bees. Past experiences with plywood makes me extremely cautious about nailing the edges of plywood. I had no desire to split the sheets and weaken the structure. We used a drill to make pilot holes and drive 1 5/8” screws for fasteners. Kelly, likewise, recommends the use of screws. In addition, we used wood glue on each joint. Once the sides and bottom board were attached to the back end piece, the structure was very sturdy and the front end piece could be attached.
At this point, the ends of the spacers are trimmed and the handles are attached. Kelly recommended two inch wide pieces of plywood. It may have been strong enough, but I preferred a piece of 1x4 scrap lumber I had handy. The length turned out to be about 58” for each handle. This allowed the pieces to extend six inches past the ends of the hive body, convenient for moving or carrying the hive – eight inches would have been better. There was an obvious shortcoming in the width of the sides – I should have gone with my gut-instinct and cut the width at 14 inches. But, on the plus side, the 1x4 handles would fix the shortcoming and make a stronger handle than plywood. Looking back, we might have run out of plywood if we didn’t use scrap lumber. The handles should come flush with the wide side of the end piece and still provide some overlap with the plywood sides. The handles were attached with wood glue and one inch screws (after drilling pilot holes). The one inch screws were just barely long enough, the 1 5/8” screws would have been too long. To increase the bite the one inch screw had, I took a larger drill bit and made a shallow recess for the screw heads in the plywood, so the one inch screw would bite deeper into the handles.
Roof
Next was the roof. Having learned our lesson, we measured the distance between the handles, across the top of the hive body. That would be our wide dimension for the roof gables, or end pieces – 20 ¼”. Kelly recommended 7” in height, so we drew a box 20 ¼” x 7”, found the vertical center, marked a horizontal line two inches from the bottom, and drew in the shape. The sides of the hive were a 120º angle, so the protractor was used for the bottom 2” of the roof. See Figure 3.
[img]http://i281.photobucket.com/albums/kk217/patandkaren/000_Figure_3_roof_gable.jpg[/img]
The gables fit well between the handles. Measurement between the gables, plus 1/8 “ inch to allow for paint, gave us the length for 4 plywood strips, 3 inches wide, to attach between the gables. The exact location of these strips is not too important, so long as they do not interfere with how the roof sits on the hive, and provide support for the roof. As Kelly pointed out, the roof could be a simple piece of tin or plywood, lying flat on the hive top, but I really liked the looks of his roof and followed the pattern to some extent. Rather than cutting a lot of pieces to make the roof, as he did, requiring tar paper to weather proof the roof, we cut two pieces of plywood and notched it to get the same “ginger-bread house” effect. The plywood was 51” in length, allowing for a two inch overhang at each end, and thirteen inches wide, allowing for a generous overhang on each side. The notches were ½” deep and 1” wide, made at three inch intervals. It gave the same basic effect. These roof pieces were attached to the gables with 1 5/8” screws from the outside, and 1” screws from the inside. Glue was applied between the plywood strips and the back of the roofing panels.
The roofing panels were straight cut – no bevel. This left a gap along the peak of the roof. I filled this gap with a bead of silicone. As per the article, two small strips of plywood (about 1-2 inches wide) were cut with a 30 degree bevel, and matched up nicely along the peak of the roof. These were attached with wood glue and 1” screws. Using an old auger and brace, holes were bored into each gable for ventilation. Scraps of screen were attached to the inside using wood scraps, glue and ¾” nails. We primed and painted the outside (you never paint the inside of a hive). That pretty much completed construction of the hive. A simple affair, and with lessons learned, I think I could do it in a day. As it was, we took about two days, taking our time and tending to other chores around the yard. Using 1 ¼” screws might simplify construction also, but I wouldn’t run out and by them unless the 1” screws had run out.
Unlike a conventional Langstroth hive, where hive bodies are stacked one on top of the other, a top-bar hive does not give the bees access to the space above the top-bars. In a conventional hive, the bees need this access because it leads to more frames. The top-bar hive is all on a single level, so this access is not a requirement. If the bees could get into this space, they would fill it with burr comb and propolis (bee glue) – it is a large empty space. This makes it crucial for the top bars to fit together closely enough to prevent bees from getting into the roof area.
The top-bars were supposed to be 1 3/8” wide – this affects bee space. Most store bought 2x2 and 2x4 is around 1 ½” thick. Pricing eight foot lengths of 2x2 I found they cost almost as much as 2x4, so we picked up three 2x4’s. A friend of mine has a planer and table saw, and cut the top-bars for me. First, he planed the boards to a thickness of 1 3/8”. The boards were then ripped on a table saw, resulting in six boards 1 3/8” x 1 7/8”. The cut sides were the most square, so they were used as the bottom surface of the top bars. Next, a ½” slot was cut along the length of these boards. This slot, or kerf, will receive the spline (a thin piece of wood) that will serve as the foundation for the top-bar hive. We made spline by shaving scrap lumber with the table saw. The spline is just wide enough to fit into the kerf with a little coaxing from a rubber mallet and trimming by whittling the edge with a utility knife. When the spline fits, a little elmer’s glue holds them in permanently. Once the glue on all the top bars has dried, the spline is painted with bees-wax. I had some old bees wax candles with burned out wicks. Chips from the old candles were melted in a pyrex measuring cup sitting in a pot of boiling water.
